
Your SINGER M1605
Singer's instructions rewritten in plain English, with every setting kept exactly as Singer intended, and with tips from our team added along the way. Stuck on something? Ask the Live Sewing Advisor at any point.
This manual applies to UK spec machines.
Important - please read: getting the best out of your machine
The questions our customers ask us most - worth two minutes before you start.
- 💡The bobbin goes in a bobbin case at the front
The M1605 has a front-loading bobbin. Put the bobbin in its bobbin case with the thread running clockwise, pull it into the slit and under the finger, then push the case firmly into the shuttle. - 💡Fabric not moving? Take the darning plate off
The darning plate is only for darning, free motion sewing and sewing on buttons. For normal sewing, take it off. - 🔄Always turn the handwheel towards you
Turning it away from you can knock the timing out. - ⚡Switch off before you thread or change anything
Turn the power switch to O (off) before threading, changing the needle or foot, or taking out the bobbin. - 📦Keep the box and packaging
Please keep the box and packaging for your machine, should it ever need to be sent away for servicing or repair. - 🔄Stitching problems? Rethread first
If you ever have an issue with stitching, tension, looping or jamming, the first thing to do is rethread the machine. If the issue persists, change the needle and bobbin, clean out the bobbin area, and make sure no thread is stuck anywhere in the thread path or in the bobbin area. If you have tried all of these and are still having issues, please do get in touch with our support team. - 🧹Keep the bobbin area clean
We recommend you clean out your bobbin area with a brush or cotton bud every 4 to 6 bobbin changes, to keep your machine free of lint and debris. - 🔄Change your needle
To keep your machine stitching perfectly, we recommend changing your needle every 6 to 8 hours of sewing. We supply needles in different sizes and for different types of materials - including stretch, jeans/denim, leather, and multiple sizes of universal needles to suit the weight of the fabric. - 🧵Use good thread
Always try to use good quality branded threads such as Gutermann, Coats, Hemline or Mettler. Avoid non-branded threads, such as ones found in supermarkets or on some online marketplaces. - ✅Use the correct bobbin
With very few exceptions, Singer machines use Class 15 plastic bobbins. Always use the type that came with your machine - we recommend genuine bobbins only. Even slight differences in bobbin size or weight can cause the machine not to stitch correctly. - ⚙Let the machine feed the fabric
Modern machines have extremely good feeding mechanisms, designed to pull the fabric through the machine for you. Try to avoid pulling the fabric through to the point of bending the needle, as this can cause the needle to strike the bobbin case or needle plate. - 💬We are here to help
Always feel free to message us for help and advice on how to get the best out of your machine.
Getting to know your machine
Important safety instructions
When using any electrical appliance, basic safety precautions should always be followed, including the ones below. Read all the instructions before using this sewing machine.
DANGER - to reduce the risk of electric shock
- Never leave the machine unattended while it is plugged in. The socket the machine is plugged into should be easy to reach.
- Always unplug the machine from the socket straight after use and before cleaning, removing covers, oiling, or making any other adjustment mentioned in this manual.
WARNING - to reduce the risk of burns, fire, electric shock or injury
- Do not let the machine be used as a toy. Take close care when it is used by or near children.
- Only use the machine for its intended purpose, as described in this manual. Only use attachments recommended by the manufacturer, as listed in this manual.
- Never use the machine if the cord or plug is damaged, if it is not working properly, or if it has been dropped, damaged or dropped into water. Take it to your nearest authorised dealer or service centre to be examined, repaired or adjusted, electrically or mechanically.
- Never use the machine with any of its air openings blocked. Keep the ventilation openings of the machine and the foot control free from lint, dust and loose cloth.
- Keep your fingers away from all moving parts. Take special care around the needle.
- Always use the correct needle plate. The wrong plate can cause the needle to break.
- Do not use bent needles.
- Do not pull or push the fabric while sewing. It can bend the needle and make it break.
- Wear safety glasses.
- Turn the power switch to O (off) when making any adjustments in the needle area - threading the needle, changing the needle, threading the bobbin, changing the presser foot and so on.
- Never drop or insert any object into any opening.
- Do not use outdoors.
- Do not use where aerosol (spray) products are being used or where oxygen is being given.
- To disconnect, turn all controls to off (O), then take the plug out of the socket.
- Do not unplug by pulling the cord. Hold the plug, not the cord.
- The foot control is used to operate the machine. Never put anything else on the foot control.
- Do not use the machine if it is wet.
- If the LED light is damaged or broken, it must be replaced by the manufacturer, its service agent or a similarly qualified person, to avoid a hazard.
- If the cord connected to the foot control is damaged, it must be replaced by the manufacturer, its service agent or a similarly qualified person, to avoid a hazard.
- This machine is double insulated. Only use identical replacement parts - see Servicing a double-insulated machine below.
Children and people who need help
This machine can be used by children aged 8 and over, and by people with reduced physical, sensory or mental capabilities or without experience and knowledge, if they are supervised or have been shown how to use it safely and understand the hazards. Children must not play with the machine. Cleaning and user maintenance must not be done by children without supervision.
The noise level in normal use is less than 75dB(A).
Servicing a double-insulated machine
A double-insulated machine has two systems of insulation instead of an earth. It has no earth, and one must not be added. Servicing it needs great care and knowledge of the system, and should only be done by qualified service staff. Replacement parts must be identical to the original parts. A double-insulated product is marked DOUBLE INSULATION or DOUBLE INSULATED.
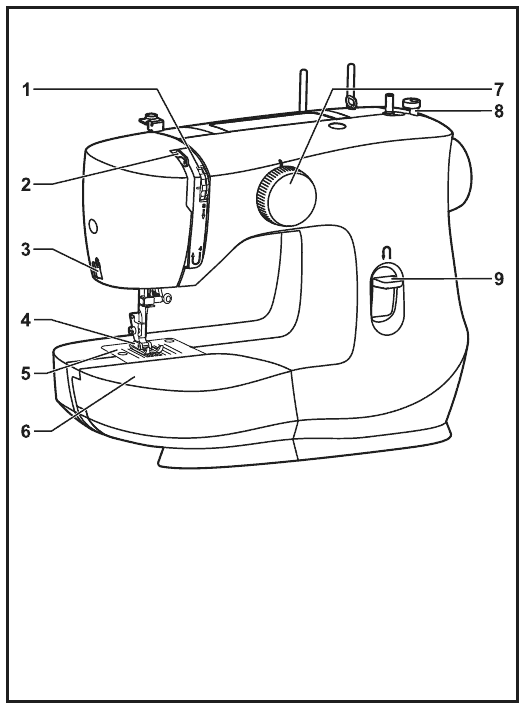
Parts of the machine - front
- Thread tension dial
- Thread take-up lever
- Thread cutter
- Presser foot
- Needle plate
- Removable accessory tray (accessory storage)
- Pattern selector dial
- Bobbin winding stopper
- Reverse sewing lever
Unpacking
- Put the box on a steady, flat surface. Lift the machine out of the box and take off the outer packaging.
- Remove all the other packing material and the plastic bag.
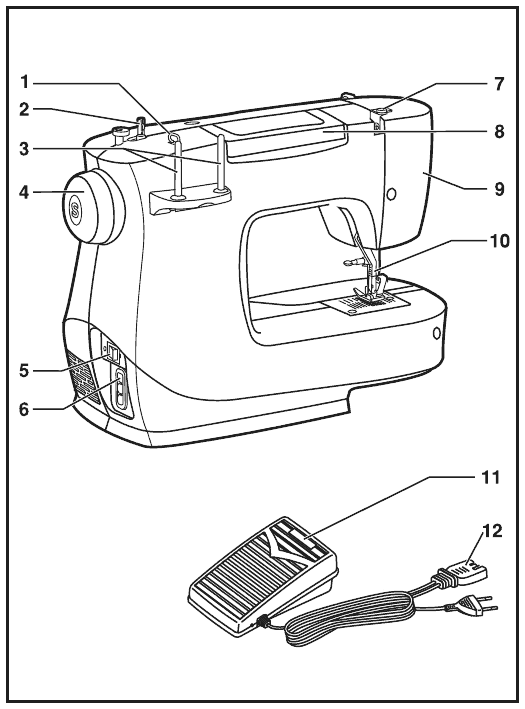
Parts of the machine - back
- Thread guide
- Bobbin winder spindle
- Spool pin
- Handwheel
- Power and light switch
- Main plug socket
- Bobbin thread guide
- Carrying handle
- Face plate
- Presser foot lifter
- Foot control (speed)
- Power cord
Connecting to the power
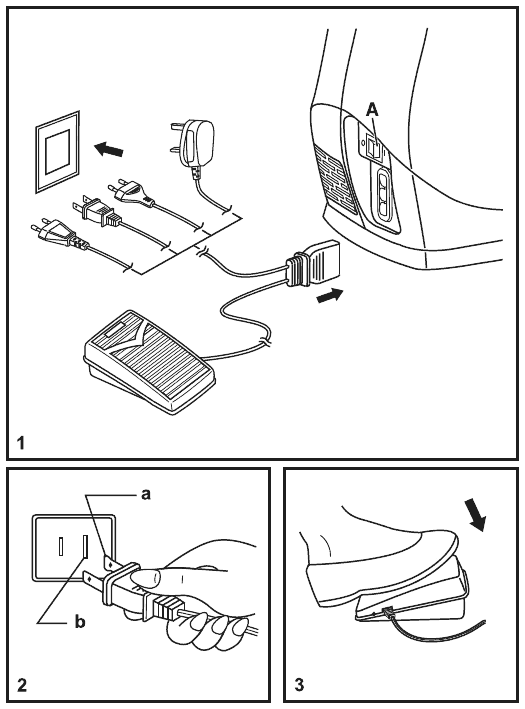
Plug the foot control into the machine and the power cord into the wall socket, as shown (1).
The foot control sets your sewing speed - the harder you press, the faster you sew (3).
Press the main switch (A) to I to turn on the power and the sewing light.
- Unplug the power cord whenever you are not using the machine.
- Only use the foot control supplied with the machine, or one supplied by an approved SINGER retailer.
- If you are unsure how to connect the machine to the power, ask a qualified electrician.
Useful for this
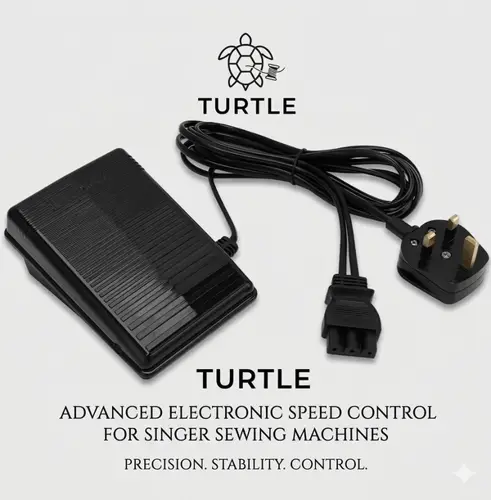 Turtle Foot Control£49.99
The rest of this manual is for our customers
24 more sections, including step-by-step guides, stitch settings and troubleshooting.
The full manual and our Live Sewing Advisor come free with every machine we sell.
Order a Singer M1605Already a customer? Log inBought your machine somewhere else? Get the full manual, plus our Live Sewing Advisor for any sewing question, for 30 days.
Get 30 days' access - £10 one-offA one-off payment of £10 for 30 days - no subscription. Instant access by email, including every interactive sewing machine manual we have.